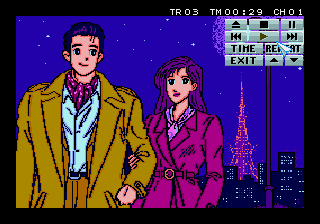
If you spend enough time on certain corners of YouTube there’s a good chance you’ve run into “they didn’t have to go this hard” videos where people highlight the kinds of songs they’ve found in obscure places they allege had no reason to be as good as they are. And, should you land on the video game sub-niche of this particular niche, there’s a very good chance the title theme to Donk! The Samurai Duck for Amiga CD32 will eventually show up:
I think a lot of these “they didn’t have to go this hard” posts are overblown, but in this case they have a point. They quite genuinely did not need to go this hard!
Listening to it, I found myself with questions. What exactly did this have to do with a samurai duck? (Nothing.) How did this make it into the game? And who is the eurodance song by?
A quick search online told me I’m not the only person wondering that. I’ve seen quite a few posts by people asking who did that song, but no one seemed to have any answers. Which made me wonder, could I track it down myself?
The game does have credits, which is normally where I’d look to answer this kind of question. Given that it’s still a mystery, you can imagine that it wasn’t too much of a help this time. The game does have a credited composer, Tim Ericson, but the title theme is instead credited just to “Fate!” From context, it’s not clear who Fate! is. Is that a band? A person? The abstract concept?
This Tim Ericson has no other game credits at all, which isn’t rare per se but it’s definitely uncommon. That said, in the early CD game era a number of companies ended up pulling in people with experience in the pop or electronic music world since they were familiar with CD music production. Guessing that might be what was happening here, I went to Discogs where I found a plausible looking Tim Ericson. This one started out doing house/pop music production in the mid-90s before moving onto techno, and, well. Just have a listen to this song from two years after Donk:
I’d say that’s a good match for the duck song, wouldn’t you?
So, at this point, I’m pretty sure I know who Tim Ericson is, but who’s Fate!? I have no definitive answers, but I’ve got a reasonable guess. It’s not unheard of for a production like this to put together a little virtual band; grab a few musicians and a singer you know, or even a group you’ve been trying to launch professionally, and record a song with them. There’s a good chance the name was coined one-off for the game with was no intention of ever using the name a second time. It’s certainly a good way to imply they were using a licensed track from a band that you’re meant to recognize.
Wherever that “Fate!” name comes from, it’s almost certainly the same Tim Ericson composing and producing this track just like with the rest of the game. Is it a bit of an anticlimax to say “the credited composer of the game is the person who made the song people are wondering about”? Maybe, but it seems many people asking this question haven’t connected these particular dots. I’d sure love all the details someday though!
As I’ve mentioned in a previous post, I’ve been working on a fan translation for a Sega Saturn game called Magic School Lunar! As I get closer to the end of the process I’ve been doing more playtesting, but since I’m only testing the script at this point I found myself wanting to cut out the parts of the game I don’t really need to be testing right now. This game has an infamously high random battle rate; at least half my time playing the game is just going through battles1, and there’s no reason to waste my time with any of that when I just want to check the script in-game.
I already know how to turn the encounter rate off, but that wouldn’t solve boss battles. I’d need to be able to fight those for real, and since I’d be skipping all of the random battles I’d be going into each boss with underpowered level 1 characters.
There are probably other ways to have tackled this, but I decided to go about it by working out the game’s save file format so that I could just start the game giving every character maxed out stats. Being able to edit the save files further down the line might turn out to be handy.
The Saturn, like other CD-based systems, uses a memory card2 format with multiple saves per memory card, so I started by extracting the individual game save3 as its own file so that I didn’t need to worry about running into anything unrelated from other saves on the same cards. I made a save game right at the start of the game, noted down my party’s stats, then started digging in the file to see if I could find them.
…but I didn’t, which surprised me. I started out looking for key stats like attack and defense, but none of the primary stats I wanted seemed to be present in the save game except HP and MP. I was a little puzzled, but as I tried searching for other stats I realized what was happening: the only value I could find was the character’s total experience points… and that was also the only thing I needed to find.
Magic School Lunar! has no way for your character to raise their stats outside of gaining levels, and no way to gain levels outside of gaining experience. It wasn’t storing the rest of those stats because it didn’t need to: given just your current experience pool, the game can calculate what level you’re at by checking where that puts you on the level curve, and then look up what your stats should be at that level. I wasn’t finding the rest of those stats since they never really exist outside of memory!
I’d been hoping to just put all my stats up to the maximum, so this wasn’t quite what I was after, but it’s good enough4. I could just give everyone the maximum experience to bump them up to the highest possible level, and that’ll be plenty5. So I edited one character’s XP, loaded it in the game, and… it didn’t work.
I wasn’t all that surprised, though. Save game formats often have some kind of integrity protection feature, either to protect against cheating or corruption, so I’d been expecting something like that here too. For a game like this it would almost certainly be using a simple checksum, which is usually just handled by literally summing all of the bytes in the data and storing that somewhere in the file. It’s not a terribly secure hashing routine, but for something like this it doesn’t need to be.
So I tried loading the save, sitting for a minute, and then saving again. I figured that changing nothing else, not even moving my characters, should minimize the number of unrelated changes in the file and help me isolate the checksum. Unfortunately, as it turns out, it did that a little too well - the new save only had four bytes different, and I quickly identified those bytes not as a checksum but as a 32-bit integer at the start of the save tracking your playtime in seconds from the start of the game. It’s useful knowing that’s not the data I wanted, I suppose, but why didn’t the checksum change?
So I tried something different. I went out to fight a few battles, letting exactly one of my characters gain a few experience points. I then tried comparing that save to the original one to see what changed. Obviously I had a lot more values to sift through, but I started narrowing it down. I also started producing some values to compare it to. Betting that this is probably a simple checksum format, I tried actually calculating the checksum for a few different possible slices of data and comparing them in 16-bit and 32-bit integer formats6 to see if any of those values that had changed between the saves resembled them.
This took me a little longer than I’d expected, mostly because I made a bad assumption going in. Given the amount of data being summed here (about 1012 bytes), I presumed we were looking at at least a 16-bit value. Maybe it would reserve a full four bytes, even if it wouldn’t need that much space. But as I started looking at potential hashes for the game, I noticed something. There was one byte that did resemble the checksums I’d found… just one byte.
As it turns out, Magic School Lunar! really has reserved a single byte for the checksum. It calculates a full sum over (most of) the save file, but then clips it down to only the least significant byte. So, for example, if the sum of all bytes is 18279 (0x4767), then it takes only the last byte of that number (0x67). The checksum also doesn’t cover the entire file; it seems to exclude the first eight bytes, which act as a sort of header. That header includes the playtime (which I’d already discovered wasn’t checksummed!), the current chapter and average party level7, and the checksum itself. Once I started checksumming everything past the first eight bytes, I was able to produce a checksum that matched what the game itself did and ensured it would be happy to accept my changes.
So I tested it out and confirmed that, yes, the game was happy to accept my changes now! As it happens, a single character starts the game with the maximum amount of experience8, so I even knew the maximum experience I could assign everyone else to max their stats out and make them as powerful as I could.
To make these tweaks easier on myself, I threw together a quick and dirty save editor in Python. I’ve also typed up my notes on where everything is located in the save file in case anyone else finds that useful in the future. I’ve put it up on Codeberg, and in the meantime I’m back to testing now that I never have to worry about winning a battle again.
And that’s after I’ve adjusted the encounter rate from the original game to make it more fun to play!↩
The Saturn actually also comes with builtin save memory, which is surprisingly convenient. It’s only 32KB, but for the era that’s spacious enough that I think a lot of Saturn owners never bothered buying an external memory card.↩
Extracted Saturn saves are usually handled in a format called BUP, which was created by the Saturn community and which is supported by a number of different tools now. I was working with BUP files, but note that all of my references to offsets in this post assume there’s no BUP header at the start of the file. If you’re reading along with your own save in BUP format and would like to compare, just add 0x40 to any offset I mention.↩
I suppose I could also have edited the stats table in the game to max out those stats, but I’m trying to avoid making too many code/data changes that are unrelated to the translation just to make sure I don’t confuse bugs from my debug settings for bugs in the translation.↩
My first testing playthrough, where I left battles on, I finished the game at level 41. Since level 99 is the cap, I should be able to easily stomp every boss at this level without needing to fight a single random battle.↩
ImHex’s builtin checksum feature was pretty useful for this, since it updates in realtime as you select data in the file. Unfortunately it also seems to be very crash-prone, so it took me a little longer than it might have otherwise.↩
The chapter and average party level are just for display in the save loading screen; changing them does nothing else. They’re followed by what looks like a padding byte, since it’s always been 0 in every save I’ve checked.↩
For a brief period, the characters are joined by an extremely powerful sorceror named Glen. He starts the game maxed out at level 99 and easily stomps out any enemy he runs into, just to emphasize how much more powerful he is than anyone else.↩
This is a story from the old days before we had YouTube or the bandwidth to stream audio.
Back then, if you wanted to listen to music from a video game, maybe you could track down an official soundtrack CD—or, if you were a mega nerd like me, you’d download ripped chiptunes and their special players. These files are basically cut-down versions of the original game data, containing the game’s music data and its original player; it’s intended to be paired with a special audio player which is essentially a cut-down emulator for the console which emulates the CPU and sound chip but not the rest of the hardware. Since they stripped out anything the game didn’t need to play the music, they were usually tiny. Entire soundtracks for 8-bit and 16-bit games could easily fit in under 50KB1, which made it easy for me to sample stuff on a whim even with a dialup internet connection.
For me, these were a great way to try out the music to games I’d read about but never actually played. It was especially great for those legendary games I’d heard about that used weird hardware and that I’d never have gotten to try on their original systems. There’s one game in particular that fascinated me: Konami’s Lagrange Point. It was one of a set of NES games that were famous in the early emulation scene for using the “expansion audio” feature of the Famicom, the Japanese version of the system. This allowed game cartridges to include extra audio hardware which games could use simultaneously with the builtin chip for richer and much more complex music. This feature was missing from international versions of the NES, and until emulation most people outside Japan had only heard rumours about what games like Castlevania III had actually sounded like in their original versions.
Lagrange Point had an especially mystical reputation for being the only NES game using Konami’s VRC7 sound chip2, which was much more advanced than anything else on the system. It used a sound chip using entirely different technology from every other NES game; its Yamaha YM2413 is an FM synthesis chip closer to the 16-bit Sega Genesis than anything that anything else used on the NES3, and I just had to hear what that sounded like for myself. Here, click play and take a listen to the first track for yourself:
It’s a nice sound, isn’t it? It’s surreal to me hearing sound like this coming out of an NES game that feels like it should have much more primitive instruments.
That said, when I grabbed an .NSF rip of the game and popped it in the first player I could find that did VRC7 audio, that’s not what I heard. What I heard was this:
That’s not really the same at all, is it? Those sound like different instruments entirely, something closer to a “normal” NES instrument sound than the warm smooth instruments the game is meant to use. That scratchiness in particular has always stuck with me; it gives the game a very distinctive broken-down sound with a texture completely unlike the original game’s sound at all. Maybe this is the nostalgia talking, but I liked the sound at the time and I like it now. No one meant for it to sound this way, but I enjoy it all the same.
Fast forward about 25 years. I still use these custom players and ripped game audio today and happened to dig out the Lagrange Point NSF. It didn’t sound anything like the incorrect version I’d imprinted on, so I thought I’d hunt down that old player and take a listen again just to see if it was like I remembered. There was just one problem:
I’d forgotten what player it was.
I wasn’t going to be able to listen to the broken-down chiptunes of my dreams if I didn’t have the right player! Thus started my desperate hunt to see if I could figure out what it was.
I had the vague memory that it was a player called Meridian Advance, which was released back in 2001, but it definitely wasn’t that. It doesn’t have VRC7 support at all, so trying to play it back just got me silence and the very occasional sound it was playing from the regular NES sound chip.
If my one memory was out, what was it? I started digging through every NSF player I could find from the late 90s through the early 00s, hoping one of them would be the right one. BNSF? No VRC7 support at all. NEZplug? Plays normally. NSFten for Winamp? No VRC7. NotSo Fatso? Plays normally. Bleep? NESamp? Nosefart4? G-NSF? SlickNSF? MSP? Meridian Prime? No, no, no, no, no, no, and no. It’s a hell of a list, and as I kept failing to find what I was looking for I started to wonder if I’d imagined the whole thing.
Finally, I thought of something I should probably have considered in the first place. “Meridian Advance” implies it’s the second Meridian, doesn’t it? Just like the Game Boy Advance? Well, yes: Meridian Advance was the second of three Meridian sound players which started development after the developer lost the source code to the original Meridian in a hard drive crash5. I naively assumed that Meridian Advance could do everything the original could do, but that was a bad assumption. The original Meridian from 2000 really did have VRC7 support, and it was exactly the broken sound I remembered. Here it is:
(Yes, cloning Winamp was the most actual thing an audio player could do back then.) It runs fine under Wine so I gave it a shot and it really does sound exactly like I remember it.
Want to hear it yourself? You can download Meridian right here, and the Lagrange Point NSF here; should work fine on modern Windows or under Wine for Mac/Linux.
That’s about half a second of streaming audio on YouTube.↩
Yes, yes, I know, that Tiny Toon game uses it too. But it doesn’t use it for sound now does it?↩
To be exact, this is the same chip used in the Japanese Sega Master System and the MSX-Music, so it certainly had a history of being used on 8-bit systems. Outside Japan though, this sound is associated with systems much more advanced than the NES.↩
People who have been following me on social media may know that, for the past few years, I’ve been working on a fan translation project for a Sega Saturn RPG called Magic School Lunar. With technical and initial playtesting work wrapping up, that project is finally entering the late phases and I’m now reaching a point where I’m going to be doing a lot of rewriting of the English text. The traditional approach, in both professional localizations and fan translations, involves working in a spreadsheet with access to the original language and translation side by side. (In fan translations, it’s not even rare to work by editing raw text files.) It’s not the most convenient or fun to be writing entirely within a spreadsheet though, especially when there are technical constaints to be thinking about. This game has a strict character limit per line and a maximum of three lines per text box, and I found myself wishing for a nice way to visualize how text will look in-game so I can ensure what I’m writing will actually look good in-game. A spreadsheet just wasn’t going to cut it. But then, of course, I realized… I am a programmer. Why don’t I just write my own? So I did.
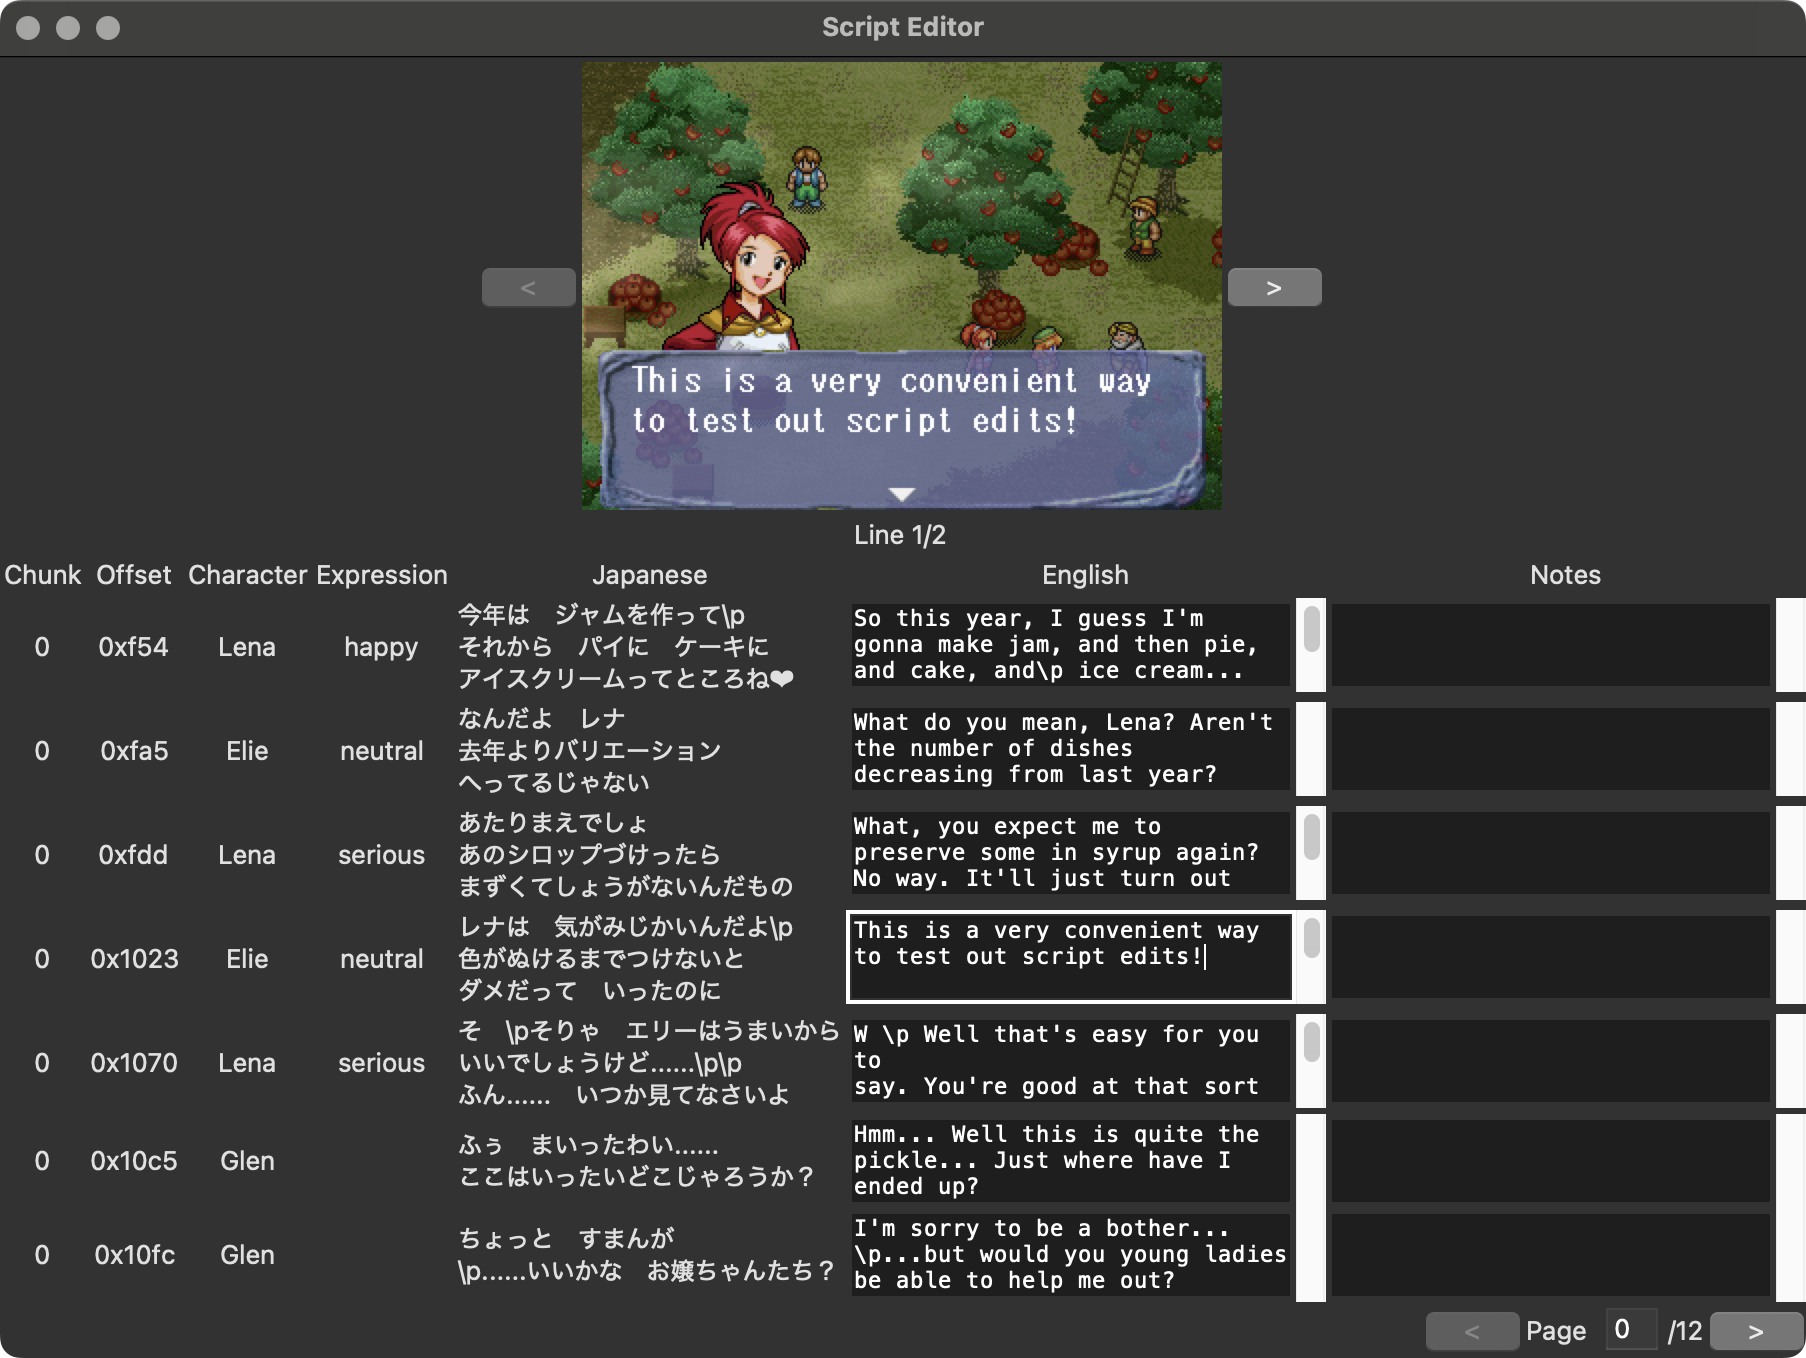
My work is based around CSV files that contain the script and metadata for every line of text in the game, and between the script itself and metadata such as what character is speaking, I had in principle enough data to mock up what any given line should look like in-game. My basic goal was to reproduce a spreadsheet-like workflow but with added screenshot visualization that updates in realtime as I work. Now that I’ve had the chance to try it out, I can say it definitely works just as well as I’d hoped. It’s much easier to catch mistakes should I find myself overflowing lines, and it’s very useful for making aesthetic decisions about text formatting too.
I decided to write a GUI app rather than a web app, for no particular reason other than because I happen to like desktop apps, and ended up using Tk as the windowing toolkit so it would be easy to run it on other platforms if someone needs to run it on something other than macOS. Although I briefly considered using a compiled language1 I ended up deciding on Python. This was partly because Python happens to have very good bindings for Tk, and partly because I’ve passed my CSVs through Python-based tooling already so I knew that the CSVs I’d output would result in minimal formatting/git repo churn. I’ve looked at Tk apps a few times but I’ve never written one of my own, so I was pleasantly surprised how easy it was to work with. I spent a few hours on this project over the course of a few days, and quite honestly most of that time was just spent picking up the basics of Tk.
I didn’t start out with the GUI though. This was all about the screenshot preview, so I figured I’d handle that first. I’ve done a little work with Python’s Pillow library before, which felt like it’d be right tool for the job, and thankfully it was quite easy to work with. All I needed was basic image compositing, and Pillow handles that very well. There were only really three elements I needed to simulate a proper screenshot:
A scene from the game with no text or character portrait
The game’s font and positioning data for where text goes
The portraits used when named characters speak and their positioning data
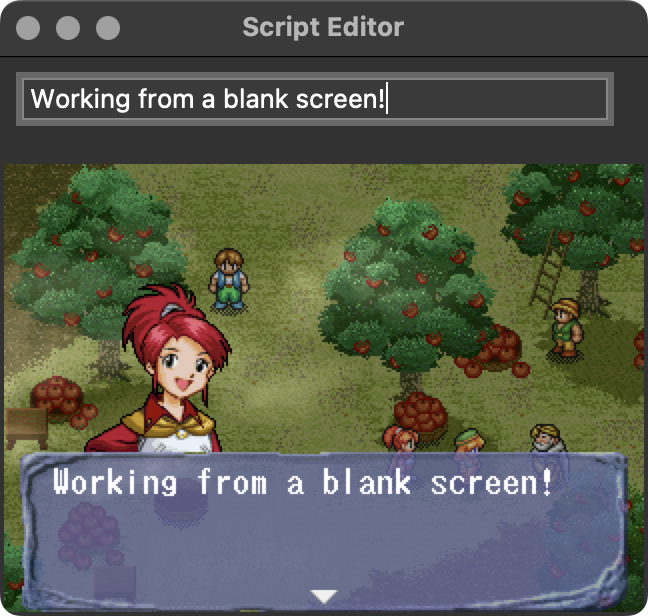
I had the raw images for the font and portraits already from the translation process, and the positioning data wasn’t too hard to find either. Magic School Lunar uses a fixed-width font2, so there’s no fancy inter-character spacing to reverse-engineer; a given index on a line is always going to go in exactly the right place. I simply grabbed real screenshots of the game and worked out exactly where where the letters belonged, then I rendered new text on top of the existing text to make sure everything was aligned exactly where it belongs. It was easy to handle the portraits as well, which always go in the same place3, so it didn’t take me long to add that either. After I was confident I had the positioning completely right, I ran off a build of the game with all the text blanked out so I could grab myself an in-game screenshot of an empty text box with no character speaking.
Once I had the actual screenshot generation taken care of, I got to work building out the real UI. I’d been prototyping with a simple MVP that just rendered the screenshot out from a single text input box and which was missing the actual script editor, and I was slightly dreading the work of laying out the real thing. I shouldn’t have worried though, since it turned out to be quite easy. I used Tk’s grid manager4 to handle the layout. It divides the screen into rows and columns, with each element laid out on a specific column and row. It’s easy to think about, but it also just happens to be a perfect match for laying out a bunch of UI elements in a table—exactly my usecase, in other words.
I was also pleasantly surprised just how easy it was to integrate the generated screenshot into the UI. Tk itself assumes images you’re displaying are coming from some kind of bitmap file, but Tk+Pillow seems to be a popular combination because Pillow has built-in Tk integration and can wrap a Pillow-generated image in a Tk-compatible image class that allows you to put a generated image anywhere that Tk accepts an image.
My only big UI issue came when I started loading larger script files. My original plan had been to populate the full UI with the entirety of a script file and implement a scrolling viewport, much like in a traditional spreadsheet app. Unfortunately, it turns out Tk has big issues rendering huge numbers of elements within a frame and it would spin its wheels for an extended period loading any input file with more than a few hundred rows. If this were an app I was making for other people, I might have chosen to try to optimize this by having it dynamically load and unload elements as you scroll, but I didn’t really need something that fancy for myself; I chose to instead just paginate the data with a limited number of rows onscreen at once along with back/forward buttons to switch pages. It works well enough for my own needs.
All in all, I was very happy how fast this all came together. I’ve already been using this to do little changes, and I know it’s going to come in handy as I get deeper into script editing. If you want to check the source code for yourself, I’ve put it up on Codeberg.
I actually considered Swift at one point, but I really didn’t want to limit this to only working on Mac.↩
Fun fact: this game uses the exact same font as the two Sega CD Lunar games in Japanese, so the English version is reusing the font from the English versions of those games for that extra nod to series history.↩
The real game sometimes puts these on the right instead of the left, but I didn’t bother simulating this since it won’t affect how I’ll be writing.↩
Tk-knowers will probably recognize that despite the grid manager being around since 1996, it’s still the “new” system to a lot of people and most code examples online are still using the older, fiddlier pack system. I decided to deal with the annoyance of having fewer examples to follow in exchange for getting to use something easier.↩
Flexing the brevity muscle today with a short post to set the record straight on a weird video game history quirk I spotted online.
For reasons that aren’t important1, I was looking up an extremely obscure 90s PC game called Team 47 GoMan. Absolutely no one has heard of this game before, which doesn’t seem to be fondly (or at all) remembered, which explains why there wasn’t all that much about it online. (“From the creators of Creep Clash” didn’t sell too many copies.) But I did see something strange. A lot of the search results online had a different title than the one I’d seen. Several of the top results called it Watchy—which I thought was weird, since it didn’t seem to have anything to do with the game at all. Even weirder, though, several of these sites had screenshots and videos of the game, but none of them used that “Watchy” title. So where did it come from?
The Mobygames page gave me a bit of a hint. It used “Watchy” as the primary title, while specifying that “Team 47 GoMan” was the title in other territories. Vaguely plausible, but at the same time not terribly satisfying. Is this US-developed game really so obscure in the US that the only screenshots and footage are of the alleged European/Japanese release?
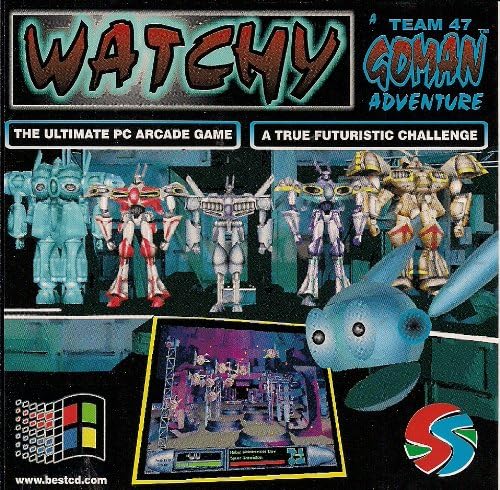
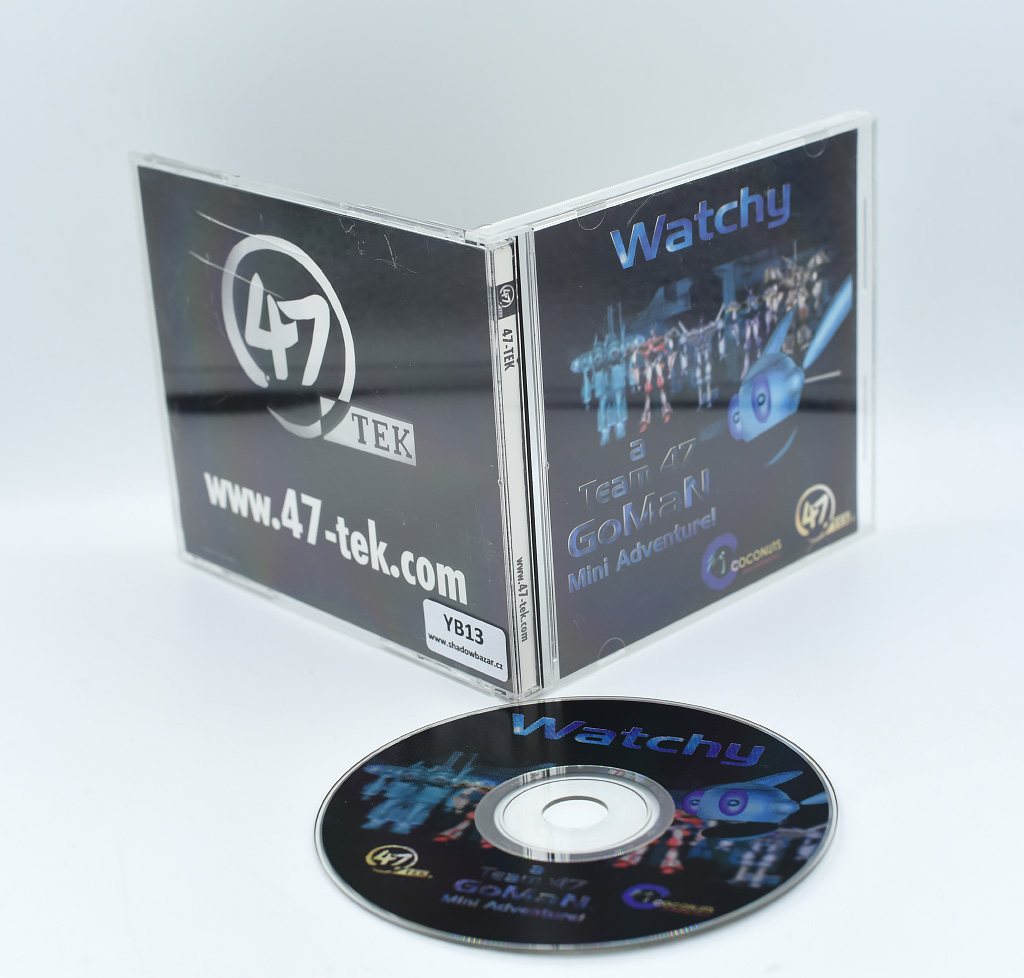
I did some searching under the “Watchy” name to see if I could find any copies for sale, and did run into two copies. One is from a Canadian budget publisher, and one seems to be from Europe. Both of them have the Watchy title and what looks like similar characters, but what really caught my eye is the subtitle. The Canadian one calls itself “A Team 47 GoMan Adventure” - which feels like a weird title if this is meant to be “Team 47 GoMan”, isn’t it? The other box is even more telling though. It reads “A Team 47 GoMan Mini Adventure!”, which makes it read a lot less like an alternate title and more like a spinoff.
At this point I did what I should have done in the first place and checked the publisher’s archived webpage. Right there, on the homepage from 1998, I had the evidence I needed—a page for their “GoMan™ 3 Pack”, which included Team 47 GoMan itself along with a screensaver and, of course, Watchy. This, it turns out, is a spinoff like I thought it must have been from the title. It’s described as a 2D arcade action game, and from looking at footage that was linked to me when I was talking about it on Bluesky it’s a much simpler game than the actual GoMan.
But why was part of the internet convinced these were the same game? I think this may have accidentally come from Mobygames or another database like it, since many of the pages with the wrong title have text that seems to be copied and pasted from one place. The Mobygames page was created in 2009, and luckily the Wayback Machine has copies going back to 2009-2010 that show it using the Team 47 GoMan title. By 2013 the title had become Watchy, so someone clearly changed the main title somewhere in between.2 Why? I suspect it’s that Canadian box I showed earlier, which comes from the only Amazon.com product listing with “Team 47 GoMan” in it. It sure feels like someone was looking the game up, found the box on Amazon with a different title, and assumed that was the primary game title in the US and so it should be the main game title on Mobygames as well3.
Even though this is correct on Mobygames now, I expect the long tail of this particular mixup to take awhile. The other online references to “Watchy” all seem to be copied from Mobygames, which is a common pattern online; a lot of game history is more or less rumour, copied from site to site without actually going back to check with sources. But these pages also don’t tend to update very often once they’ve been created, which means that even if Mobygames has been corrected I expect it to take a long time for the web to correct itself.
Which is why I’m writing this. If someone online finds one of these abandonware sites and wonders why the page is calling the game they just downloaded “Watchy”, at least they might find this post in a search engine telling them that it’s wrong—and why.
The observant will notice that the description still reads “Team 47 GoMan”, which should have been a sign that I should have questioned the primary game title sooner.↩
I’m not really a fan of Mobygames’s policy that the US title for a game is always the default title no matter where it’s from or when it came out, but that’s another story…↩
I’m happy to announce that I’ve been granted permission to resume development on dist/cargo-dist, the easy-to-use binary packaging and distribution tool. As someone who uses dist a lot in my own projects, I’ve been hoping to be able to keep the project going and I hope this will be useful for other people as well.
I’ve just released version 0.28.1, a bugfix release based on the last stable version. This fixes the critical issues around GitHub Actions runners and also includes a number of other important bugfixes. Please give it a try and let me know how it goes!
I’m planning an 0.29.0 in the near future containing all of the improvements that originated in Astral’s fork, and longterm I’m planning to keep it going as long as there are people interested in using it. I’d like this to move forward in a community-supported model with members of the community contributing new features they’re interested in.
Every now and then, I run into a bug so mystifying on its face I know it’s going to be a journey just from the error message. This is one of those stories.
I work at a Python shop right now, and we were upgrading an app to Django 5. There are a few breaking changes, but nothing too unexpected or out of the ordinary. Everything was working great in our development environment, but once we deployed to our QA environment we noticed something very strange—an IntegrityError exception telling us that an object couldn’t be saved because the primary key already existed in the database.
My immediate reaction was that, well, that was unusual. I didn’t think we were ever manually assigning an id and we were always relying on the database’s autoincrement. I double checked the code in the traceback, and indeed, all I saw was something harmless. An anonymized version looks something like this:
Not only were we not assigning it a clashing id, we weren’t even creating a new row from scratch. This was an existing database record we’d just queried for, then updated a single property on and then saved. We shouldn’t have been trying to insert a new row into the database at all—Django should have been able to know to UPDATE the existing row it itself had fetched in the first place. I wracked my head trying to figure out what was going on, and started trying everything I could think of to narrow it down:
Did it always happen? (Yes.)
Did it happen with every record, not just that one? (Yes—or so we thought.)
Did it happen if I simplified the code to the most basic possible version, to isolate out anything else that could be messing with it? (Yes; just fetching the record and immediately saving it without changes triggered the bug.)
Did it happen if I forced Django to perform an UPDATE instead of an INSERT? (Yes, but with new symptoms; calling object.save(force_update=True) failed with a message about how it couldn’t do an UPDATE because the row didn’t exist.)
Did it happen from a django-admin shell on the QA server? (Yes.)
Could I manually query for and update the row from a psql console? (Yes, so Postgres itself was fine.)
By this point several of us were poking at the problem from different angles trying to figure out exactly what was going on. We had a little breakthrough when a coworker idly tried fetching not one of our recent records but the record with id 1—and Django was perfectly happy to save it back. It was only some of our records that seemed to be cursed, and again only in Django—Postgres itself would happily write to them.
By this point there were three of us poking at the problem, and each of us made a discovery building on the experiments we’d done so far that ended up cracking the problem. First, one person took a look at the queryset that Django used to determine if the primary key existed in the database and discovered that it was completely empty. This determines whether Django thinks the record is newly-created or not, and so—even though the record was fetched from the database—it determined the record was new and should be inserted into the database with an INSERT instead of using UPDATE on an existing row.
Well, that was the proximate cause, but that didn’t yet explain why that was happening. The next clue came in the discovery that the Django model definitions and the schema of the actual database had drifted for historical reasons. Specifically, several tables—including this one—were specified as using an int for their primary key in Django, but used bigint in the real database. This was true for both our QA server and production, so it wasn’t just a QA-specific drift. We also, at this point, noticed that the records we were having trouble with all had ids outside the int range. Until this point, the only small primary key we’d tried was id=1, but we tried a selection of other small ids and found that Django would read and write those just fine. It was only once we entered bigint’s range that the Django problem reared its head.
Which, finally, led me to look back at something I’d previously noticed but not paid much attention to in the Django 5.0 release notes. In the Miscellaneous section, it mentions that
Filtering querysets against overflowing integer values now always returns an empty queryset. As a consequence, you may need to use ExpressionWrapper() to explicitly wrap arithmetic against integer fields in such cases.
This took on new meaning with the knowledge we now had about the mismatch of primary key types. We were in fact filtering querysets against overflowing integer values, or rather Django itself was because Django had been given a wrong understanding of what the integer type was. In prior versions, Django had let the “impossible” comparison carry out and it worked by chance; in Django 5, it enforced internal correctness by rejecting a comparison the underlying database would be able to carry out. I certainly can’t call it the wrong decision from a correctness standpoint, but it was a hell of an issue to debug!
I’ve written a bit recently about CD-ROM preservation and some of the more niche, easily-missed parts of the format. I’ve covered the formats themselves, but I felt it might help to provide some concrete examples of the kind of data that can easily be missed and that might not get backed up.
As I mentioned in a previous post, many CD disc image formats don’t include the disc’s subcode data1. Most discs don’t use it for any non-structural data, and in the cases where it’s used for copy protection it’s immediately obvious that it’s needed since the backed up software won’t work. There are cases that are subtler, however, and where actually significant data in the subcode can be missed.
CD+G is an extension to the Compact Disc format that allows displaying simple graphics alongside the audio content of a CD. It comes well before CD-ROM, so it’s designed for CD players that are hooked up to a TV rather than computers. CD+G stores its graphics in the disc’s subcode data, which means that only backups that include that data actually capture the full content of the disc. Back up a CD+G disc in a format that doesn’t include subcode data, like BIN/CUE, and it just turns into a normal audio CD. These graphics can be used for anything; the first CD+G release, Firesign Theatre’s 1985 comedy album (shown above) features illustrations to accompany the audio. It was never widely-used, but it did develop a significant niche in karaoke discs as a way to display lyrics on-screen.
I want to talk a little more about how easy it can be to miss that a disc has significant CD+G data, so let’s take a look at a few practical examples. A simple example is the Firesign Theatre album mentioned above. The packaging, as seen on Discogs, doesn’t mention the CD+G content at all, aside from a brief reference in the album credits—most owners of this disc would have no idea the CD+G content existed, and would never have owned a player. It’s very likely that most people backing up their disc wouldn’t even know they had skipped some of its content.
That’s a little too simple, though. A little too neat and tidy. Let’s take a look at something more fun.
In the 16-bit era, the first CD-based game consoles all had support for playing music CDs as a bonus feature. Many of these consoles also supported CD+G, and for many families these would have been their only CD+G player. The Victor Wondermega, a high-end all-in-one Sega Mega Drive/Mega CD console released in Japan, leaned into CD+G’s popularity as a karaoke format by making karaoke one of its major features—including two microphone ports built right into the console. The system was bundled with a pack-in CD called Wondermega Collection that showed off all aspects of its features: it includes several minigames that can be played in Mega CD mode, and two karaoke audio tracks that can be played if the player boots into the system’s CD player instead of the game.
Screenshots of two disc images of Wondermega Collection running in the same CD player. The screenshot on the left is played without the subcode information, so it's recognized as audio-only. The screenshot on the right is played with the subcode information, so the CD+G content is correctly identified and rendered during playback.
Those karaoke tracks are coded using CD+G2, which means that they’re only properly backed up if the disc is ripped in a format which supports subcode data. And, because of the complexity of the disc, there are many reasons that it’s easy to fail to notice that this data was missed:
Since the disc contains both Mega CD and audio CD content, the audio CD portion could easily be missed when testing the backup. In this case, it’s easy to miss that the audio CD tracks actually had unique content beyond the audio itself.
Not all Mega CD emulators support subcode data, so it may not be clear how to even test that the disc is complete or incomplete.
The Redump standard doesn’t include subcode data in the set of data it validates3, so those backing up their discs to match Redump’s database may discard the subcode data without realizing that it’s significant.
So what’s the lesson here? Well, first of all, it’s simply that it’s difficult to fully audit all of the content on a disc to confirm that a backup is fully functional. The more kinds of distinct content on a disc, as in our Wondermega Collection example, the harder. (This is similar to the example of Mac/Windows hybrid discs I gave in my previous post, where by only testing a backup on one operating system an archivist might miss that they had discarded data for the other.) The second lesson is that it’s not always obvious what content even exists on a disc, and it’s easy to throw something away simply by not knowing it existed in the first place.
My personal recommendation, for those creating raw disc backups of physical CDs, is simply to always store the subcode data—at only 4% the size of the disc’s primary data, it adds very little extra storage burden in exchange for being sure that nothing is being lost. For the truly storage space-starved, it’s worth at least doing a full audit to make sure that no CD+G, CD-TEXT or similar data is present before discarding subcode data.
Which, yes, means they do work on any CD player that supports CD+G, including regular karaoke CD players.↩
This isn’t out of ignorance—there are technical limitations that make it difficult to validate the fixity of subcode data. Redump’s database only includes data that can be reliably reproduced; omitting subcode data doesn’t mean that it’s not significant or that it shouldn’t be backed up along with the rest of the disc’s content, just that it can’t be validated in the same way that the disc’s main contents can be.↩
I’m releasing a tool I wrote for myself: cue2ccd, a commandline tool to convert CD-ROM disc images from the BIN/CUE format to the CloneCD format. For as many disc image conversion tools as there are out there, I hadn’t found anything open-source or cross-platform that can handle going between these two specific formats—so I wrote it myself.
This is a very niche tool, but it solves one specific problem I have. I own a Rhea optical drive emulator for the Sega Saturn, a device which replaces the original CD drive in the console and allows it to load media from disc images on an SD card instead of physical CDs. The Rhea’s great in a lot of ways, but it has one specific limitation: it doesn’t load games in the BIN/CUE disc image format1. Since a lot of media online is in that format, I’ve really been wanting a convenient way to convert existing BIN/CUE images I have lying around into something I can use. Given how niche this is I don’t expect many other people to need it, but I hope it’s helpful if there’s anyone else in the same situation.
Usage is as simple as possible: just run cue2ccd path_to_cuesheet.cue and it’ll produce new .img, .ccd and .sub files in the same directory, ready for use. I’ve set up convenient commandline installers for installing it on Mac, Linux, and Windows, which are available from the website, and it can be installed using Homebrew by running brew install mistydemeo/formulae/cue2ccd.
From here, I’d like to take a little dive into the details of what this kind of conversion looks like and what I needed to do. I’m not planning to go into my specific implementation, but rather I’d like to focus on the details of the formats and the problems I ran into when writing cue2ccd. If you don’t care about the technical details, you can skip the rest of the post (but please enjoy the tool, if you use it!). There are three primary things I needed to handle: writing CloneCD control files (.ccd), writing subcode data (.sub), and merging multi-track images.
Writing CloneCD control files
Like I mentioned in a previous post, CloneCD’s table of contents format is lower-level and much more complex than the cue sheets used by BIN/CUE disc images. Here’s a sample cue sheet for a disc image with one data track and two audio tracks:
123456789
FILE "disc.bin" BINARY
TRACK 01 MODE1/2352
INDEX 01 00:00:00
TRACK 02 AUDIO
INDEX 00 00:04:16
INDEX 01 00:06:16
TRACK 03 AUDIO
INDEX 00 00:07:16
INDEX 01 00:09:16
These nine lines capture (most of) the essential parts of a CD, without getting into details: it lists which tracks exist (and which files those tracks are stored in); what type and mode each of those tracks are; and that track’s indices, with their locations on the disc.2
The equivalent CloneCD file, meanwhile, is 121 lines long and contains entries that look like this:
And it continues from there—as you can imagine, it’s a much more complex format to generate! At its core, though, they’re both representing roughly the same information: the table of contents of a disc, with the tracks and their definitions. All of the information I need to generate the CloneCD files either exists in the cue sheet or can be derived based on information I have access to. This data fits into three categories, one of which is data shared in common between cue sheets and the CloneCD format:
Data about each track, including its list of indices and start/stop timestamps3
Overall data about the disc and the session (missing from the cue sheet)
Data about the disc’s lead-in and lead-out sections (missing from the cue sheet)
Track-level metadata
That’s a lot to go over, but this turned out not to be as complex as I thought it might be. I’ll gloss over the disc-level metadata (which is fairly brief); let’s look at what the two formats share in common instead, the track-level metadata. We’ll do direct comparison of the same track from both the cue sheet and the CloneCD file, starting with the cue sheet:
12
TRACK 01 MODE1/2352
INDEX 01 00:00:00
Despite being fairly short, it encodes a few different bits of information that we’ll be wanting to reproduce.
This is track 1 on the disc;
It’s a data track, specifically a mode 1 data track.4
That data track is stored in the disc image with “raw” 2352-byte sectors, meaning error correction is included. This field isn’t important for us, since cue2ccd only works with raw disc images.
This track contains a single index, numbered 1, which begins at the timestamp 00:00:00—that is, at the very beginning of the disc image.
It’s all, in other words, pretty core structural metadata about the track and how it’s formed. Now let’s take a look at the CloneCD version:
At first glance, it looks pretty overwhelming! It turns out, however, it’s not actually as complex as it seems. The field names may seem difficult to understand at first flance, but the good news is that they’re based directly on the table of contents from the lead-in on a real CD, and so all of them (with the same or similar names) are documented in the CD spec.
The Point (pointer) field is a hex value which means a few different things depending on context. For a standard track, it’s the track number. In this case, we know from the cue sheet that this is track 1, so it’s set to 1.
The Control field is a hex value which indicates information about the track type, along with some other metadata that isn’t relevant to us. This is four bits out of a byte in the CD’s binary format, but CloneCD lets us just write a number. There are only two values that matter to us: audio (0) or data (4). We’ve got a data track, so this uses 4.
The track starts at 00:00:00, so we mark the same values here. They’re just in three separate fields, unlike the cue sheet where they’re written as a single timestamp. We get PMin=0, PSec=2 and PFrame=0. (If that seems like an off-by-two value to you, well-spotted. The explanation comes later.)
The PLBA field contains essentially the same information as in the Min/Sec/Frame fields, but expressed in terms of the number of sectors since the beginning of the disc’s content. In this case, this track begins at the start of the disc, so that’s 0.
The AMin, ASec and AFrame values mean something in other contexts, but here are left at zero.
The Zero field always contains a 0. What a surprise!
Finally, a few fields aren’t relevant to us and get hardcoded, like Adr and TrackNo.
Whew! In other words, this is mostly the same data as in the cue sheet, it’s just in a more verbose form and using terms that only make sense after reading the CD-ROM spec. Knowing what these fields mean, it wasn’t too hard to generate these CloneCD tracks given the equivalent information from the cue sheet.
Lead-in and lead-out
I mentioned earlier that the CloneCD format includes information about the lead-in and lead-out. These are sections at the beginning and end of the disc that aren’t typically stored, in their raw format, in disc images. The lead-in contains the raw, binary table of contents information for the disc while the lead-out contains information about the disc’s duration.
This is missing from the cue sheet format, but we can derive the info we need from what’s in the CloneCD data. These are stored as “entries” in the CloneCD control file alongside the tracks, and actually looks a lot like track data. The fields share names with the ones used for track data, but some of them take on different meanings when used like this.
To give you an idea what this looks like, here’s an abbreviated copy of the first/last track information for this disc with only the fields that differ from regular track data.
The Point field is the POINTER field defined in 22.3.4.2 of the CD-ROM spec. Previously, when talking about tracks, we set this to the track number. When set to a value outside the 1-99 track number range, it means something different. Two of those values can be seen above: 0xa0 means that this entry contains information about the first track on the disc, while 0xa1 means the last track. When set to these values, it changes the meaning of the remaining fields. Instead of containing timing information, the PMin field is used to specify the track number of the first or last track on the disc, and the other two values are left empty. These two fields tell the player how many tracks to expect when reading the rest of the disc. The PLBA fields are still here, and still calculated based on the Min/Sec/Frame values, but they’re essentially meaningless for these entries since the Min/Sec/Frame aren’t real timestamps.
Finally, we get to the lead-out, which looks like this (relevant fields only):
12345
[Entry 2]
Point=0xa2
PMin=0
PSec=12
PFrame=16
A pointer of 0xa2 indicates that the remaining values are describing the beginning of the disc’s lead-out—or, in other words, describing the end of data. Here, the Min/Sec/Frame values are a timecode again, but instead of describing the start of a section of data, they describe the timestamp marking the end of the disc. (Yes, 12.21 seconds is accurate; this is a small test image containing three seconds-long tracks.) This is actually pretty critical info: it tells the CD player when it should stop seeking at the end of the CD, and makes it possible to tell how long the disc is as a whole.
Parsing and oddities
I went for libcue for parsing cue sheets, since it provides a simple and straightforward track-oriented interface which makes it easy to query all of the track definitions. Writing my own parser in Rust felt out of scope. There are a couple of pure-Rust parsers on crates.io, but they’re oriented around music files like FLAC and are missing a few features I’d need for raw disc images. Instead, I wrote a small crate that acts as a thin binding for libcue while adapting a few bits of its interface to Rust conventions.
One of the more annoying gotchas of the cue sheet format is that it leaves out one important piece of information that’s necessary to render the lead-out entry. Let’s take another peek at the cue sheet, and see if it jumps out at you.
123456789
FILE "disc.bin" BINARY
TRACK 01 MODE1/2352
INDEX 01 00:00:00
TRACK 02 AUDIO
INDEX 00 00:04:16
INDEX 01 00:06:16
TRACK 03 AUDIO
INDEX 00 00:07:16
INDEX 01 00:09:16
It lists where tracks and indices start… but it doesn’t show where they end. libcue calculates track ends for every track except the last by checking where the next index starts, and returns that with the rest of the information that’s in the file, but the duration and endpoint of the final track is left completely ambiguous. The only way to get that information is to check the file size of the actual underlying disc image file and calculate how many sectors long it is. It’s not the end of the world, but it is annoying—and it’s the one and only bit of metadata generation I did that required access to the underlying data files. I would have loved if I could have worked just off of the metadata.
Another interesting gotcha is the timestamps, which have an unusual off-by-150 problem. As I mentioned previously, the lead-in and lead-out sections are usually omitted from the binary content of a disc image. Since the lead-in takes up the first 150 sectors on the disc, this means that standard disc images actually start at index 150 into the disc, not index 0. This gives us an conundrum for absolute timestamps. Although the BIN/CUE images appear at first glance to have absolute timestamps that are comparable with the CloneCD file, its definition is slightly different.
With a single BIN file, a cue sheet’s indices are absolute indices into the BIN file. Since the first index within the BIN file is actually sector 150 on the disc, it means that the timecodes for that BIN file are offset from the real CD by 150. Let’s take another look at some absolute timestamps for the two formats for a practical example:
12
TRACK 02 AUDIO
INDEX 01 00:06:16
123
PMin=0
PSec=8
PFrame=16
This track on our sample image begins at 00:06:16 into the BIN/CUE… which means that, for CloneCD, it has an absolute timestamp of exactly two seconds more, 00:08:16. In practice, applying an offset when translating timestamps wasn’t actually that hard, but it was a place where where errors seeped in. For a nontrivial part of my tool’s life, I had an off-by-one error from sloppy timestamp conversion.
Generating subcode data
The second thing I needed to create was subcode data (aka subchannel data), a form of builtin metadata used on CD. On physical CDs, each 2352-byte sector is accompanied by 98 bytes of subcode data. The subcode data is necessary when reading a physical CD but not typically needed when mounting or burning a disc image, so a number of disc image formats—including BIN/CUE and plain ISO files—don’t bother reading or saving it at all. The CloneCD format does back it up, however, and the device I’m using requires valid subcode data. I knew I’d need to generate it myself.
Subcode data is a binary format encoding very similar information to the entries we just saw in the text-based CloneCD control format above. Each 98-byte subcode sector contains two bytes of synchronization words, followed by 96 bytes of data divided into eight channels with lettered names from P to W. In the original CD and CD-ROM specs, only the P and Q channels are specified; channels R through W were set aside for later expansion, and most discs never use them. They were used for standards such as CD-TEXT, which allowed encoding human-readable track names on a CD; CD+G, which allowed encoding simple graphics, such as on karaoke CDs; and various copy protection systems. For my usecase, none of those were relevant, so I only needed to generate data for the P and Q channels.
P channel
The P channel was by far the simplest, and took very little work to do. It’s used to indicate the boundaries between tracks for very primitive early players which didn’t keep track of table of contents information. If a sector is within the first 150 sectors of the start of a track, it’s filled with FF bytes. Otherwise, it contains 00 bytes. There’s no other variation, so it was very easy to implement.
Q channel
The Q channel is slightly more complex. Before getting into the details, let’s look at a little sample of what a single Q channel sector looks like. Here’s the raw bytes in hex format:
1
41010100 00480000 0248F2BB
There’s a chance you may be able to put together some of this based on the description of the entries in a CloneCD control file earlier, but don’t worry, we’ll come back to this later.
This channel primarily consists of timing information: it encodes the timestamp of the currently-playing sector, a flag indicating whether this sector is data or audio, and some simple forms of metadata5. It also contains a 16-bit checksum, allowing the data in the rest of the Q channel to be validated. The metadata in question isn’t relevant to my usecase, so I only needed to worry about the timestamps, the data flag, and the checksum.
Control and q-Mode fields
The first byte is separated into two four-bit fields. That is, it contains data which is smaller than one byte—an idea that isn’t always familiar to people who aren’t familiar with binary data. Since a byte contains eight bits, it’s possible to fit multiple fields into a single byte if they’re smaller than one byte. In this case, instead of using the full byte for one field, we can split that one byte in half and use it to store two four-bit fields.
The first of these fields, the control field, consists of a few different flags, but only one is relevant here: the data flag. When unset, it indicates that this sector contains audio; when set, it indicates that it contains data. In our case, that means taking the first four bits of our byte and setting them to 0100.
The second field indicates the type of data being encoded in the following bytes. Since I’m ignoring the alternate metadata that could be represented here, I always set it to the value indicating that the bytes to follow will contain timing information. In our case, that means taking the last four bits of our byte and setting it to 0001. Putting it all together, we get a byte with the bits:
1
01000001
Or, read as a single byte:
1
41
Timestamps
As with the CloneCD control file, timestamps are stored as separate minute, second and fraction fields. The Q channel contains two different timestamps and some other timekeeping information:
The track number
The index number
The timestamp relative to the current track
The absolute timestamp
All of these values are stored in binary-coded decimal (BCD) format, which has the side bonus that it makes this data easy to read by eye with a hex editor. I made use of that while debugging.
For the most part, these timestamp fields are straightforward to implement so long as I pass the right data in. There was one fun gotcha, however. CD audio contains gaps between tracks called “pregaps”; they’re defined as index 0 within a track, with the track itself beginning at index 1. They throw an interesting edge case for calculating relative timestamps. What does it mean to track the timestamp relative to the start of the track for a time that isn’t part of the track? Since this binary-coded digital format doesn’t support negative numbers, the standard uses a slightly strange but appropriate workaround. Within the pregaps, the relative timestamp instead starts at the length of the pregap and then counts down until it hits 0, which marks the beginning of the track, at which point it begins counting up again. Needless to say, this was the source of a few fun off-by-one bugs.
Checksum
Finally, it ends with a 16-bit (two-byte) checksum of the remainder of the data. The CRC-16 routine it uses is specified in the CD-ROM spec; I generated a suitable C CRC-16 routine using the Ruby crc library, then translated it into Rust. I’ve published it standalone as the cdrom_crc crate.
Putting it all together
Here’s that raw data again, with each byte annotated:
12345678910111213141516171819202122
41 - This one byte is actually two different fields,
each of which takes up four bits.
The first four bits are the control field;
here, 0100 indicates this is a data track.
The next four bits are are the Q-mode field.
0001 indicates the remainder of the data is time
information.
01 - This is the track number - track 01.
01 - This is the current index - index 01.
00 - These next three bytes make up the relative
position of this sector within the track,
00:00:48.
00
48
00 - This is the zero field. It's always zero.
00 - These next three bytes make up the absolute
position of this sector on the disc,
00:02:48.
02
48
F2 - These last two bytes are the 16-bit checksum.
BB
Not actually that much information, and not too hard to make sense of after taking the time to assemble everything, but it certainly took some work to get there.
Luckily for me, the CloneCD representation of subcode data is simplified in a few ways that made things easier. CloneCD ignores the two sync bytes, storing only the 96 data bytes, which saved me the trouble of handling them. It also reorders the data to be easier to reason about. On a physical CD, the subcode for a sector isn’t contiguous. Instead, every 32-byte frame of a data sector is followed by a single byte containing one single bit from each of the eight channels. Assembling a complete byte for the channels requires waiting for eight frames and reordering the bits as they come in. CloneCD, meanwhile, reorders the data into the standard byte order. There may be technical reasons why this is the case when streaming from a CD, but I’m just grateful to get to write bytes like a normal person.
Merging disc images
I actually had a version of cue2ccd ready to release about a year ago, but I had one last feature I really wanted and kept putting off: merging disc images.
More specifically, I wanted to handle disc images containing multiple files. A lot of BIN/CUE disc images use a single BIN file containing all tracks, sort of like how a CD itself is structured, and that’s what the initial version of cue2ccd was written for. In recent years, however, split images have become more common. These are still raw images, but they use separate raw disc image files for every track on the disc. In theory, doing this is easy; the data is the same, you just need to concatenate the files. No work at all. Unfortunately, the metadata is a bit harder. Let’s take a look at the disc from earlier in its original one-file version:
123456789
FILE "disc.bin" BINARY
TRACK 01 MODE1/2352
INDEX 01 00:00:00
TRACK 02 AUDIO
INDEX 00 00:04:16
INDEX 01 00:06:16
TRACK 03 AUDIO
INDEX 00 00:07:16
INDEX 01 00:09:16
Now let’s take a look at the exact same disc, but in a one-file-per-track form:
1234567891011
FILE "disc (Track 01).bin" BINARY
TRACK 01 MODE1/2352
INDEX 01 00:00:00
FILE "disc (Track 02).bin" BINARY
TRACK 02 AUDIO
INDEX 00 00:00:00
INDEX 01 00:02:00
FILE "disc (Track 03).bin" BINARY
TRACK 03 AUDIO
INDEX 00 00:00:00
INDEX 01 00:02:00
It may strike you that those timestamps aren’t useful. And you wouldn’t be entirely wrong. They’re all the same now! What the heck? What happened?
Well, as I (briefly) mentioned earlier, the timestamps in a cue sheet are timestamps into that file, not absolute timestamps into the disc. For a single-file disc image there’s almost no difference between the two, except the off-by-150 issue I mentioned previously. But if a single binary also contains a single track, it suddenly becomes a lot more obvious that the offsets for each track are specific to each file.
So, in practice, implementing this didn’t just mean concatenating the files. It also meant, for each track, keeping track of the size of the disc up until that point so that I could convert each of these relative timestamps into an absolute one. It’s not necessarily hard work but it’s an easy source of off-by-one errors and other similar mistakes, so I had a few revisions with subtly wrong timing. It also runs into a harsher version of the “no duration of the last track” problem: since every track is its own file, now every track is the last track in its file, so none of them have durations available from the metadata. I was able to apply what I’d already written to calculate the duration based on the filesize, with a fix for a bug that only happened when it wasn’t the last track in a larger file, but I’d certainly have preferred not to have to do it at all.
In conclusion: CD is weird
Honestly, it’s been fun to get to dig deeper into a format not many people still care about these days. I’d also like to thank a couple of people whose help with previous projects was very useful for this one: the creator of the Rhea, Phoebe and GDEmu hardware, who was gracious in providing support debugging my earliest attempts at generating files compatible with his hardware; and CyberWarriorX, with whom I worked on an earlier CloneCD-generating project.
It also supports a few other formats, such as DiscJuggler and Alcohol 120%, but there aren’t any open-source tools to convert to those either.↩
Each track is divided into one or more indices. Index 1 is the actual start of the track, while index 0 defines a gap that comes before the actual track begins, and indices 2 and beyond are rare. The gap between tracks is typically called a “pregap”. On a real CD player, when picking a track by number, the player will start straight from that track’s index 1. When letting the disc play through from a previous track, however, the disc will play the pregap defined in index 0 first before proceeding to index 1.↩
Since CD was originally designed just for music, all indices to locations on the disc are measured in terms of timestamps instead of a more data-oriented index like an address in bytes. These timestamps are stored in three parts: minutes, seconds, and 1/75 fractions of a second. For example, if a track starts at two seconds into the disc, its timestamp is 00:02:00. libcue translates these into a logical block address, eg a number of sectors, which would mean the previous example is 150. The CloneCD format reproduces the original CD-ROM spec’s timestamps, but additionally stores logical block addresses in some places for convenience.↩
There are a few different modes of data track which have different data layouts. A data sector is always 2352 bytes with a mixture of data and error correction data. The different modes have different ratios of data to error correction. Mode 1, the original and most common mode, uses 2048 bytes out of every sector for data with the remaining 304 bytes serving as error correction.↩
It’s also used in the disc’s lead-in and lead-out, but I’m not dealing with those sections of the disc.↩
(This was originally posted on a social media site; I’ve revised and updated it for my blog.)
The other day a friend asked me a pretty interesting question: what happened to all those companies who made those Japanese computer platforms that were never released outside Japan? I thought it’d be worth expanding that answer into a full-size post.
A quick introduction: the players
It’s hard to remember these days, but there there used to be an incredible amount of variety in the computer space. There were a lot of different computer platforms, pretty much all of them totally incompatible with each other. North America settled on the IBM PC/Mac duopoly pretty early1, but Europe still had plenty of other computers popular well into the 90s, and Japan had its own computers that essentially didn’t exist anywhere else.
So who were they? By the 16-bit computer era, there’s three I’m going to talk about today2: NEC’s PC-98, Fujitsu’s FM Towns, and Sharp’s X68000. The PC-98 was far and away the biggest of those platforms, with the other two having a more niche market.
The PC-98 in a time of transition
First, a quick digression: what is this DOS thing?
The thing about DOS is that it’s a much thinner OS than what we think of in 2024. When you’re writing DOS software of any kind of complexity, you’re talking straight to the hardware, or to drivers that are specific to particular classes of hardware. When we talk about “DOS” in the west, we specifically mean “DOS on IBM compatible PCs”. PC-98 and FM Towns both had DOS-based operating systems, but their hardware was nothing at all like IBM compatible PCs and there was no level of software compatibility between them. The PC-98 was originally a DOS-based computer without a GUI of any kind - just like DOS-based IBM PCs. When we talk about “PC-98” games and software, what we really mean is DOS-based PC-98 software that only runs on that platform.
Windows software is very different from DOS in one important way: Windows incorporates a hardware abstraction layer. Software written for Windows APIs doesn’t need to be specific to particular hardware, and that set the stage for the major transition that was going to come.
NEC and Microsoft teamed up on porting Windows to the PC-98 platform. Both the PC-98 and the IBM PC use the same CPU, even though the rest of their hardware is very different, which made the port technically feasible. The first Windows release for PC-98 came out in 1992, but Windows didn’t really take off in a big way until Windows 95 in the mid-90s. And so, suddenly, for the first time software could run on both IBM PCs running Japanese language Windows and PC-98 running Windows.3 Software developers didn’t have to do anything special to get that compatibility: it happened by default, so long as they were using the standard Windows software features and didn’t talk directly to the hardware.
Around the same time, NEC started making IBM-compatible PCs. As far as I can tell, they made both PC-98s and IBM PCs alongside each other for quite a few years. With Windows software not caring what the underlying hardware was, the distinction between “PC-98” and “PC” got a lot fuzzier. If you were buying a PC, you had no reason to buy a PC-98 unless you wanted to run DOS-based PC-98 software. If you just wanted that shiny new Windows software, why not buy the cheaper IBM PC that NEC would also sell you?
So, for the PC-98, the answer isn’t really that it died - it sort of faded away and merged into what every other system was becoming.
The FM Towns
The FM Towns had a similar transition. While it had a homegrown GUI-based OS called Towns OS, it was relatively primitive compared to Windows 3 and especially Windows 95. The FM Towns also used the same CPU as IBM PCs and the PC-98, which means Microsoft could work with Fujitsu to port their software to the platform. And, just like what happened with the PC-98, the platform became far less relevant and less distinctive when it was just another platform to run Windows software on. If you didn’t care about running the older FM Towns-specific software, why would you care about buying an FM Towns instead of any other IBM PC?
Fujitsu, just like NEC, made the transition to making standard Windows PCs and discontinued the FM Towns a few years later.
The X68000 loses out in the CPU wars
Unlike the other two platforms, the X68000 had a different CPU and a distinct homegrown OS. It used the 68000 series of processors from Motorola, which were incredibly popular in the 80s and 90s. The same CPU was used by the Mac until the mid 90s, the Amiga, and a huge number of home consoles and arcade boards. It was a powerful CPU, but when every other platform was looking for a way to merge with the Windows platform, they had a big problem: you simply couldn’t port Windows to the platform and get it to run regular Windows software because they didn’t use the same CPUs. Sharp were locked out. While they also switched to making Windows PCs in the 90s, they had no way to bring their existing users with them by giving them a transition path.
The lure of multitasking
Why did Windows win out, though? In the west we often credit Microsoft Office as the killer app, but it wasn’t a major player in Japan where Japanese language-specific word processors were huge in the market for years. I’d argue instead that multitasking was the killer feature.
In the DOS era, you ran one program at a time. You might have a lot of software you used, but you’d pick one program to use at a time. If you wanted to switch to something else, you’d have to save whatever you’re doing, quit, and open a completely different full-screen app. While competing platforms like the Mac4 had multitasking via their GUIs for years, Windows and especially Windows 3 is what brought it to the wider market.
If you’re going to be using more than one program at the same time, having a wider amount of software that’s inter-compatible becomes more important. I’d argue that multitasking is what nudged market consolidation onto a smaller number of computers. Windows, and especially Windows 95, became very hard for other platforms to compete with because its base of software was just so large. It made far more sense for NEC and Fujitsu to bring Windows to their users even if it meant losing the lock-in that their unique OSs and platform-specific software had gotten them.
Shifts in the gaming market
In the 16-bit era, the FM Towns and X68000 were doing great in the computer gaming niche. They had powerful 2D gaming hardware and a lot of very sophisticated action games. Their original games and ports of arcade games compared extremely well against what 16-bit consoles could do, giving them a reputation of being the real gamers' platforms. By 1994 though, they had a problem: the 32-bit consoles were out, which could do 2D games just as well as the FM Towns and X68000, and the consoles could also do 3D that blew away anything those computers could handle. Fujitsu and Sharp, meanwhile, just weren’t releasing new hardware that could keep up. The PC gaming niche had already been shrinking and moving towards consoles for a few years, and this killed off a lot of what was left.
I also suspect that Sony’s marketing for the PlayStation changed things significantly. Home computers had older players than the 16-bit consoles did, but Sony was marketing the PS1 towards those same older audiences. It probably made it easy for computer players to look at the new consoles and decide to move on.
What about the 8-bit platforms?
Japan had a variety of 8-bit computer platforms, some of which (like the MSX) were also well-known in western countries. While in Europe the 8-bit micros held on right into the 90s, and many users upgraded straight from 8-bit micros to Windows PCs, in Japan the 8-bit computers had already been supplanted by native 16-bit computing platforms before the Windows era. In some cases, these were 16-bit computers by the same manufacturers - both Sharp and NEC had been major players in the 8-bit computing era too. The MSX, meanwhile, had failed to produce either a 16-bit evolution of the platform or a 16-bit successor and so many of its users had already moved on by the time Windows 95 came out.
So, in conclusion
None of the 16-bit Japanese computer makers acutally died off - they just switched to making standard Windows PCs that were interchangeable with anything else out there. Microsoft took over that market just like they did everywhere else in the world, but at least the companies themselves survived better than the Commodores and Ataris of the world.
Some of the 16-bit competitors, like Amiga and Atari ST, had some market penetration in North America, but they were pretty niche compared to Europe.↩
There were some others too, like Sony NEWS, but they mostly settled into the “professional workstation market” that was its own weird thing. Just like the international SGI, Sun and NeXT workstations, they had their own reasons for fading away.↩
A lot of the earlier Japanese Windows games I have list their system requirements in terms of both PC-98 and IBM PC, even though they’re not using anything specific to either platform.↩
Outside Japan the Amiga and many others also had high-quality multitasking GUIs for years, but I’m focusing specifically on Japan here.↩